No Churn Cherry Vanilla Bean Ice Cream

Cherry Vanilla Bean Ice Cream 🍒 (naturally sweetened)
We’ve had so much fun testing this recipe, I’m almost sad it’s finished—but I’m sure we’ll find new excuses for eating tons of ice cream soon enough!

And honestly, I’m just too excited about you trying this for yourself to be worried about ice cream withdrawal!😋 I really do think you’ll love it as much as we do. The texture is super luxurious + velvety and the vanilla bean adds incredible flavor and aroma-not to mention the cherry deliciousness involved!🍒 Oh and I almost forgot the best part, this recipe is naturally sweetened with honey!

Tips for today:
-This ice cream needs to chill at least 4.5 hours to attain soft-serve status, 8+ hours for solid.
-I recommend reading through our recipe directions a couple of times before making your ice cream, I find in general it helps the process go more quickly and smoothly.
-This recipe CAN be made without the guar gum, it will still be super delicious, but it will not be quite as creamy. The little bit of guar gum acts as a stabilizer here and really does make it incredibly dreamy.
-Blend in other toppings before freezing if desired like pistachios, chocolate chunks or coconut flakes, the possibilities are endless!
-Serve alone, in a sundae or in a grain-free waffle cone!
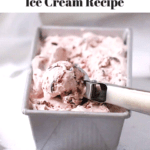
-Line your metal loaf pan with parchment paper and when your ice cream is frozen, you can remove it from the pan and cut into squares and make Klondike style bars! Just dip them in some chocolate melted down with coconut oil, let it harden and voila, Klondike Bar!

Enjoy the recipe + Happy Ice Cream Making!☺️


No Churn Cherry Vanilla Bean Ice Cream
- Total Time: 0 hours
- Yield: 8-10 scoops 1x
Ingredients
- 2 1/4 cups organic heavy whipping cream
- 20 ounces frozen cherries, thawed and drained. (Save juice)
- 4 egg yolks
- 1/3 cup honey
- 2 tablespoons cherry juice (from the frozen cherries)
- 2 teaspoons vanilla extract
- 1 vanilla bean, split and seeded (or an extra tsp of vanilla extract)
- 1/4 teaspoon guar gum (Bob’s Red Mill) (Can be omitted if necessary, see Tips in post above).
- 1/8 teaspoon cherry extract (optional)
- 1/8 teaspoon salt (optional)
Instructions
- In a large mixing bowl, add 2 cups of heavy whipping cream. Sprinkle 1/4 tsp guar gum overtop evenly. Blend with hand mixer on high for about 2 minutes or until you see firm peaks form. Set bowl aside.
- Drain your thawed cherries, but save the cherry juice and set them aside.
- Then separate 4 eggs, keeping just the yolks for this recipe. Whisk yolks briskly for about a minute in a medium sized bowl and set them aside as well.
- In a medium size pot, add 1/3 cup of honey, 1/4 cup of heavy cream, vanilla extract, vanilla bean paste and salt. Bring to a simmer, stirring constantly. Keep at a simmer while stirring for about a minute, then remove from heat. Now, you will temper the eggs–this means you will be slowly raising the temperature of the egg yolks without scrambling them. (Not as hard as it sounds, promise!)
- While whisking your egg yolks, add just a spoonful of the heated honey mixture and combine well. Then slowly start drizzling the hot mixture into the yolks, a little bit at a time while whisking briskly. Once it is all mixed in, leave it to cool COMPLETELY to room temperature.
- After your egg/honey mixture is completely cooled, slowly blend it into your whipped cream with a hand mixer. Then add 2 tbsp of your cherry juice and 1/8 tsp of cherry extract.
- Finally, blend in your cherries and pour mixture into a chilled 9x5x3 metal loaf pan. Cover and freeze for about 4.5-5 hours, it will still be a touch soft and easy to serve at this point. Freeze another few hours for it to become completely solid. Serve and enjoy!
- Prep Time: 25 min
- Cook Time: freeze 5 hours


This cherry ice cream sounds incredible! I bet that vanilla bean adds some special flavor in there. I’m looking forward to trying this, especially with one of your stellar waffle cones! 🙂
Oh thank you so much for your kind comments, Noelle! I really hope you enjoy them both!! We just made a small batch the waffle cones again tonight for fun, I think the waffle cone maker might have been a dangerous purchase, haha!;)
Love no churn ice cream and cherry gave such a stunning color 🙂
Thanks so very much Kankana! 🙂 I love no churn too– the less time it takes, the faster we get to eat it! 😉
It looks beautiful. I love how you froze it in a metal loaf pan- I’m doing that next time I make ice cream! 🙂
Oh thank you so much Josette!! 🙂 I love using the metal loaf pan, just the right size!
Just a question because I really want to make this as close to the recipe as I can, but I cannot have guar gum, could I substitute xanthan gum for the same creaminess? Thanks I will make it without if I had to it looks so yummy. Thanks
Thank you so much, Karen! Yes! You can definitely use xanthan gum instead of the guar gum, it will also act as a stabilizer and provide that creaminess. 🙂
Can you use fresh cherries pitted?
Hi Joan, absolutely! You can purée half to distribute through for extra color and coarsely chop the other half. But any which way will work beautifully, hope you enjoy the recipe!
Oh my goodness I can’t wait to make this with your cherry cranberry pie! You have me very tempted to make Klondike bars now too!! Thanks for being so dedicated to quality delicious recipes! You are amazing!!
Thank you dear Natalie, you’re so kind!! You should definitely make them Klondike style, it’s sooo good!! 😀 I hope you love the recipe!